Low level file exchange
Most transfers function using plain api calls, but in some scenarios it might be desirable to use alternative methods to transfer (mostly large) files to decrease overhead.
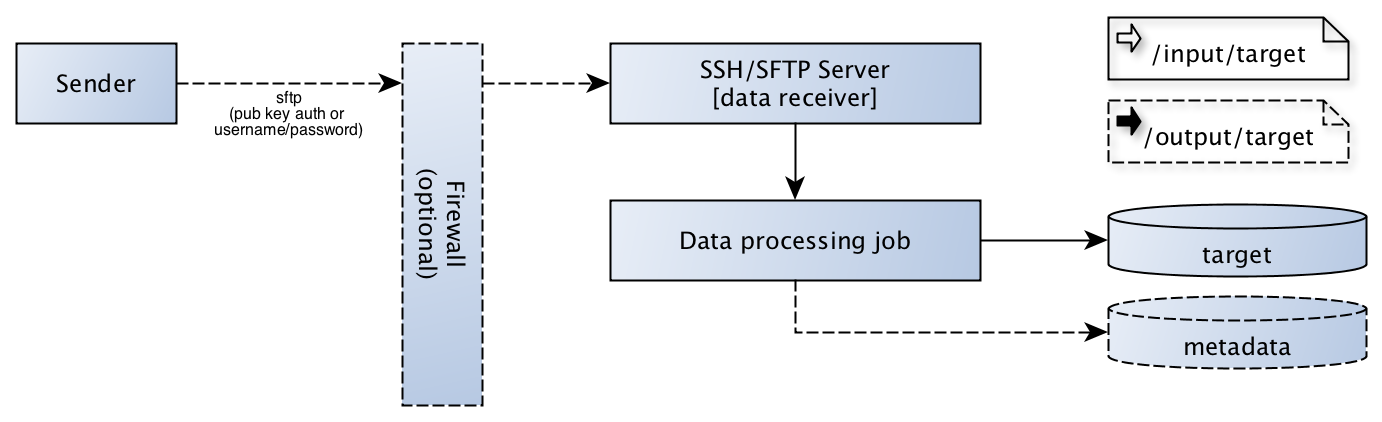
The picture below contains the scenario we’re going to describe in this chapter and the different rules we should take into account when designing these kind of solutions.
Our advised transfer scenario uses sftp using public key authentication, but password authentication will be explained as well.
Overall view / Architectural concerns.
As seen in the diagram there is a sender party ready to deliver files to a software component in our stack. In most businesses there is a firewall in between the sender party and a server in our stack, although it’s not part of our setup scenario we will mention it’s existence.
The SSH/SFTP server is the main subject of our paragraph and handles the secure transfer of files from and to our service (data processing job).
Note
When for any reason files will be delivered using password authentication, make sure to implement proper measurements to decrease the risk of brute force attacks. Tools like fail2ban can offer help here.
The receiver (“data processing job”) is the software component doing the actual work, for architectural reasons there are some requirements for the software developed there.
The receiver is responsible for archiving the sftp input directory
The receiver should handle locking
The receiver is responsible for validating the data itself (including completeness)
The sender is responsible for output which could be delivered in the output share (optional)
When processing is not handled on the same physical machine, the data processing should use sftp as well
The data processing job can either be a (collection of) service(s) or (a) script(s), depending on the application.
Tip
When splitting functionality into different (virtual) servers, it might help to us a simple library to implement sftp. pysftp is an option to minimize code in this case.
Setup sftp access
We’re using Ubuntu for our sftp server setup, any other linux or unix like setup will likely function quite similar although some paths may differ.
Add group and file exchange root
First step is to add a group to our system which we will use to jail our sftp users (Sender) and a root directory in which we will place the different sftp home directories.
Our example uses /sftp as root, but any other location will obviously work fine too.
$ groupadd sftponly
$ mkdir /sftp
Configure SSH
Next on our list is to configure the ssh daemon and replace the “Subsystem sftp” option with the one mentioned below, or add the line if “Subsystem sftp” is not in the sshd config file.
Subsystem sftp internal-sftp
Append the following block to the sshd_config file, which forces users of the group “sftponly” to chroot to their home directory.
 Match Group sftponly
     ChrootDirectory %h
     ForceCommand internal-sftp
     AllowTcpForwarding no
     X11Forwarding no
Tip
If only public key authentication is used on the server, you might consider disabling password authentication on ssh, which can be done using the PasswordAuthentication directive in the same config file.
Finally restart ssh to apply the new settings:
$ systemctl restart ssh
Tip
While still connected, try to open another shell with the same user to validate the changes. If for some reason the configuration is not valid anymore (and you cannot login), you still have the original session to fix the issue.
Adding a user and home directory
For our example we’re going to create a user data001, which will find his home in /sftp/data001.
$ mkdir /sftp/data001
$ mkdir -p /sftp/data001/input/data001
$ mkdir -p /sftp/data001/output/data001
$ mkdir /sftp/data001/.ssh
$ touch /sftp/data001/.ssh/authorized_keys
$ chmod 600 /sftp/data001/.ssh/authorized_keys
$ chmod -R 770 /sftp/data001/*
$ chmod -R g+s /sftp/data001/*
$ useradd data001 -g sftponly -s /bin/false -d /sftp/data001
$ chown -R data001:sftponly /sftp/data001/*
$ chown -R data001:sftponly /sftp/data001/.ssh
From top to bottom the following actions are performed, first all new home directories are created then we make sure the authorized_keys file for sftp is there with the correct access mode. Next step on the list is updating the access mode for the newly created directories, including the enforcement of the group rights (g+s). Then we can add the user and change ownership of all it’s files.
Now you can easily add your public ssh key to the authorized_keys file created above, which should allow access without a password using your private key.
In case you wish to use password authentication, you can set it up using:
$ passwd data001
When changing back from password to public key authentication, don’t forget to lock the account using:
$ usermod --lock data001
Note
Always validate the user rights after configuration, when configured correctly and if you try to login using ssh you should receive a message like This service allows sftp connections only.
Configuring access for the framework
If the script or service is guaranteed to run on the same machine as the ssh server is configured, you can add the service user to the sftponly group, like:
$ usermod -a -G sftponly middleware
Where our service user is called middleware. This provides access to the files written by one of the sftp users, including the deletion of the files (due to the chmod g+s).
If the services are distributed and share the same sftp location, you should add an sftp user for the services as well. By setting the home directory to the root of the sftp users (/sftp), you make sure the service user can access the files from all parties sending data.

Tip
You can add multiple public keys to the same authorized_keys files to allow all servers in your cluster to access the data from the same (middleware) user.