8. Relational modeling
Initial setup
Before we can start using our database, we need to configure the client connector. For this we create a configuration file in the config directory of our project, which should in our case contain the following:
1[defaults]
2host=192.168.56.101
3port=5432
4dbname=valuea
5user=valuea
6password=valuea
7pool_size=20
8pool_timeout=10
9driver=postgresql
Testing our setup
We’re using sqlalchemy as object relational mapper , first thing we want to check is if we can connect to our configured database.
Using the lines below we validate our configuration:
1#!/usr/bin/env python
2import sqlalchemy
3import valuea_framework.connectors.rdbms
4
5session = valuea_framework.connectors.rdbms.ORM().session()
6for row in session.execute(sqlalchemy.text('select * from version()')):
7    print (''.join(row))
This should return a response like (depending on the database version installed):
PostgreSQL 9.5.7 on x86_64-pc-linux-gnu, compiled by gcc (Ubuntu 5.4.0-6ubuntu1~16.04.4) 5.4.0 20160609, 64-bit
Note
If executing the above commands take a long time and/or return errors other then import errors, most of the time the connection settings in rdbms.conf contain issues (wrong ip, wrong user/password, etc).
Creating your first model
The first model we’re going to create is a user database, containing one or more email addresses per user. Our boilerplate is a pretty standard sqlalchemy class, extended with our wrapper (BaseModelMixin) to setup the defaults (like naming tables) and a standard declarative_base (Base) from sqlalchemy.
 1import sqlalchemy
 2from valuea_framework.connectors.rdbms_model.core import BaseModelMixin
 3from valuea_framework.connectors.rdbms_model.base import Base
 4
 5
 6class User(Base, BaseModelMixin):
 7    __table_args__ = {u'schema': 'sample'}
 8
 9    id = sqlalchemy.Column(sqlalchemy.Integer, primary_key=True, autoincrement=True)
10    name = sqlalchemy.Column(sqlalchemy.Text)
11    addresses = sqlalchemy.orm.relationship("Address", back_populates="user")
12
13
14class Address(Base, BaseModelMixin):
15    __table_args__ = {u'schema': 'sample'}
16
17    id = sqlalchemy.Column(sqlalchemy.Integer, primary_key=True, autoincrement=True)
18    user_id = sqlalchemy.Column(sqlalchemy.Integer, sqlalchemy.ForeignKey(User.id))
19    email = sqlalchemy.Column(sqlalchemy.Text)
20
21    user = sqlalchemy.orm.relationship("User", back_populates="addresses")
Let’s dig in to the different parts of our sample, first we start with the basic imports we need. As mentioned earlier we need sqlalchemy, a declarative base and our model extension to ease to process. These are the first 3 lines of our program.
Then we’re going to create a model “User” which implements the declarative base (Base) and BaseModelMixin, followed by an attribute tag containing the schema we want to use for our object once it’s created.
Next step contains of defining two fields, a key (id) and a name, for this we use the Column classes which accept field types and field properties (e.g. is this field a primary key, foreign key, create indexes, etc).
Last item in the User class is the definition of a relation, this will tell the mapper to automatically maintain the relations between the corresponding objects.
Note
Our example uses back_populates which explicitly requires both objects to refer each other, you can also use backref on User which will maintain the relation on Address automatically.
Before we can start using the model, we should create the tables in the connected database. For this purpose we include a “deploymodel” script which automatically deploys schema’s and tables. First step is to go to our project director and then execute the deploy script, or execute it using the full path as parameter.
1cd <your project directory>
2deploymodel --rdbms .
3
4deploy @ .
5please execute the following as superuser in postgresql:
6CREATE EXTENSION IF NOT EXISTS "uuid-ossp"
If the script outputs the message about “uuid-ossp” then login to the database as admin user and create the extension in your database manually. (not required for our demo, but practical to have)
Tip
Use pgAdmin to query your database, which is available for free at the following location https://www.pgadmin.org/download/
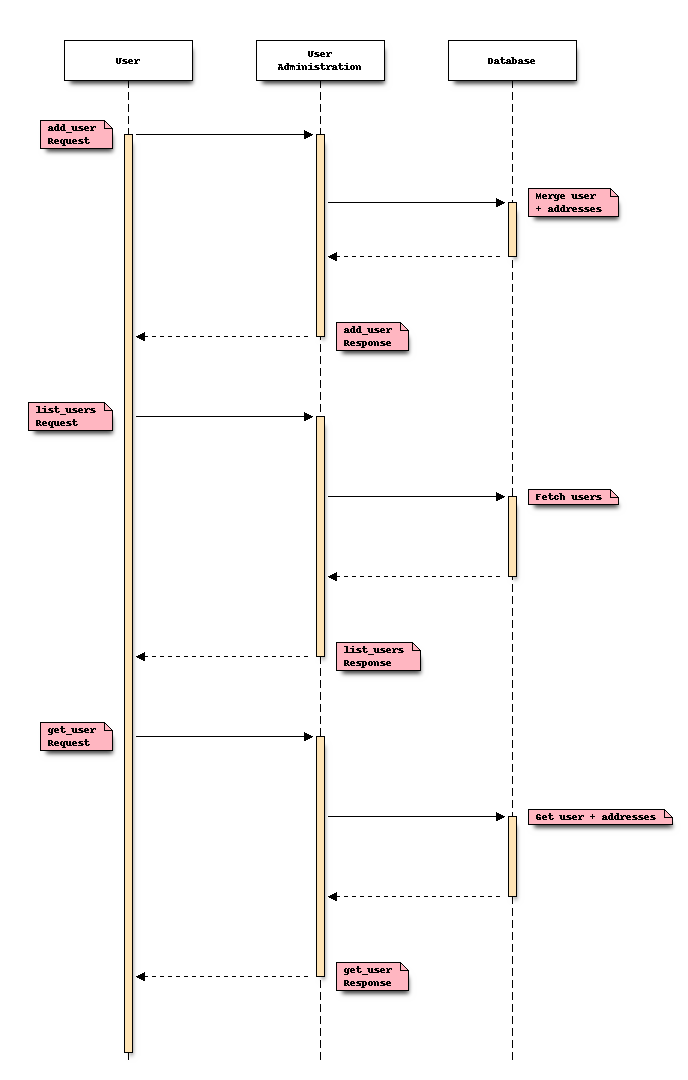
Providing access to our data
With the model available we’re planning to build some simple services to access and modify the data in it. The sequence diagram contains the scope of the application we are going to build in this chapter.
Create the “add_user” service
As with previous examples our goal is to create services which can easily be exposed to other components or subscribers. Database connectivity in the framework is included in the service, that’s why we’re going to create a similar Service class as before but derive from valuea_framework.broker.Service.ServiceRelational instead of valuea_framework.broker.Service.BaseService.
The task add_user should perform is add a user with multiple email addresses at once or overwrite the existing entry when already there.
 1import valuea_framework.broker.ServiceRelational
 2import model.valuea.sample
 3
 4
 5class Service(valuea_framework.broker.ServiceRelational):
 6    def __init__(self, *args, **kwargs):
 7        super(Service, self).__init__(*args, **kwargs)
 8
 9    def execute(self):
10        status = 'add'
11        msg = self.get_message()
12        # remove existing user and addresses
13        for user in self.rdbms_session.query(model.valuea.sample.User).\
14                filter(model.valuea.sample.User.name == msg['name']):
15            map(self.rdbms_session.delete, list(user.addresses))
16            self.rdbms_session.delete(user)
17            status = 'merge'
18
19        user = model.valuea.sample.User(name=msg['name'])
20        for address in msg['addresses']:
21            user.addresses.append(model.valuea.sample.Address(email=address))
22
23        # merge user (including addresses) and commit all in this session
24        self.rdbms_session.merge(user)
25        self.rdbms_session.commit()
26
27        return {'status': status}
The service described above consists of a new class dervice from ServiceRelational, which includes standard wrappers to access our database, which is noticeable in line 13 (self.rdbms_session). Step by step this is what’s happening in our service:
[L10] set our standard response status to “add”, if the input data is valid we know for sure we are going to create a new user (or modify an existing one)
[L11] fetch our input data, which should contain a name and addresses (see json scheme)
[L13,14] because our “add” is actually a “merge” operation, we will search for an existing user first
[L15] delete all related addresses using a map operator (which accepts a function and a list of items)
[L16] delete the user
[L17] set response status to “merge” since we found a user
[L19] create a new user object, using the parameter name (which maps to the name attribute)
[L20, L21] for every email address in the supplied parameters add a new Address object to the user
[L22] merge user and associated address into the database, this performs the actual database tasks
[L23] commit our session, otherwise it will rollback when done
[L27] return status to the user
Since our service expects its input to be valid, we need a schema to support that claim.
 1{
 2	"$schema": "http://json-schema.org/draft-04/schema#",
 3	"description": "add_user",
 4	"properties": {
 5		"name": {
 6			"type": "string"
 7		},
 8		"addresses": {
 9			"type": "array",
10			"items": {
11				"type": "string",
12				"format": "email"
13			}
14		}
15	},
16	"required": [
17		"name",
18		"addresses"
19	]
20}
Note the format keyword on the email address, this assures our data to contain valid addresses.
Tip
The json schema validation defines multiple formats, which are described in the rfc you can also use regular expressions to match formats using the pattern clause.
Now let’s test our service:
 1#!/usr/bin/env python
 2
 3import services.valuea.samples.add_user
 4
 5
 6srv = services.valuea.samples.add_user.Service()
 7srv.set_message({'name': 'test', 'addresses': ['email1@example.com', 'email2@example.com']})
 8validation_output = srv.validate()
 9if validation_output:
10    # Oo, our validation returned issues, print all
11    for message in validation_output:
12        print (message)
13else:
14    print (srv.execute())
Tip
While at it, try to use some different input values to see the validations in action and use pgadmin4 to see the data arrive.
Create the “list_users” service
In our previous example we’ve added some data in the user database, now we’re going to add a service to list all entries in there.
 1import valuea_framework.broker.ServiceRelational
 2import model.valuea.sample
 3
 4
 5class Service(valuea_framework.broker.ServiceRelational):
 6    def __init__(self, *args, **kwargs):
 7        super(Service, self).__init__(*args, **kwargs)
 8
 9    def execute(self):
10        result = []
11        for user in self.rdbms_session.query(model.valuea.sample.User):
12            result.append({'name': user.name})
13        return result
And a simple script to test the output at our end.
1#!/usr/bin/env python
2
3import services.valuea.samples.list_users
4
5srv = services.valuea.samples.list_users.Service()
6print (srv.execute())
The content of the service is pretty straight forward, just import the model, query it using the attached session (self.rdbms_session) and add all entries found to the result variable.
Create the “get_user” service
Returning the contents of user is quite simple too, just query the user database using a filter on the name field, then if there’s an entry found return a dictionary presentation of the object.
Note
convert_to_dict() is part of BaseModelMixin which we inherited in our model, this method provides an easy handle to all (recursive) properties in your model.
 1import valuea_framework.broker.ServiceRelational
 2import model.valuea.sample
 3
 4
 5class Service(valuea_framework.broker.ServiceRelational):
 6    def __init__(self, *args, **kwargs):
 7        super(Service, self).__init__(*args, **kwargs)
 8
 9    def execute(self):
10        msg = self.get_message()
11        # find and return user as dictionary
12        for user in self.rdbms_session.query(model.valuea.sample.User).\
13                filter(model.valuea.sample.User.name == msg['name']):
14            return user.convert_to_dict()
15
16        return {}
Test it using:
1#!/usr/bin/env python
2
3import services.valuea.samples.get_user
4
5srv = services.valuea.samples.get_user.Service()
6srv.set_message({'name': 'test'})
7print (srv.execute())
Next steps
All standard operators from sqlalchemy can be used for building services, this page from the library contains quite some information about supported expressions and examples.
Tip
Our example doesn’t include a delete_user service nor does it include a service to query all users starting with a specific string (a%). Use the knowledge gathered so far to build those two services yourself.