9. NoSQL modeling
The functionality to add an additional layer of abstraction to Cassandra is part of the ValueA framework.
Initial setup
Before we can start using our NoSQL database, we need to configure the client connector. For this we create a configuration file in the config directory of our project, which should in our case contain the following:
1[servers]
2server1=192.168.56.101
3
4# No auth configured, ignore password credientials
5#[authentication]
6#username=cassandra
7#password=cassandra
Note
Please note that by default there is no authentication method configured in cassandra (/etc/cassandra/cassandra.yaml) In case you wish to add additional layers of security, you can use a PasswordAuthenticator, for more information visit the datastax page
Testing our setup
Using the lines below we validate our configuration:
1#!/usr/bin/env python
2import valuea_framework.connectors.nosql
3
4session = valuea_framework.connectors.nosql.Cassandra().session()
5
6for record in session.execute('select cluster_name, cql_version from system.local'):
7    print (record.cluster_name, record.cql_version)
8
9session.shutdown()
This should return a response like (depending on the database version installed):
(u'ValueA', u'3.4.2')
Note
If the script outputs some errors (“Exception TypeError”) on close, but the expected output is there as well, it’s safe to ignore them. Some versions of the cassandra library do have some close issues.
Creating your first model
NoSQL modeling using Cassandra is quite different then relational modeling, due to the distributed nature of the database.
In every design you have to take into account how data can be distributed over the computing nodes that define the cluster.
Cassandra uses a hashing algorithm which spreads data over the nodes using the primary key of the table, which is called a partition in Cassandra.
Within the partition you can further define your table key using clustering keys, which helps to define the uniqueness of your data but doesn’t steer the physical location of it.
The actual data in the table can use different formats, which is quite similar to sql databases.
Below an example, for a table to collect measurements at different intervals.
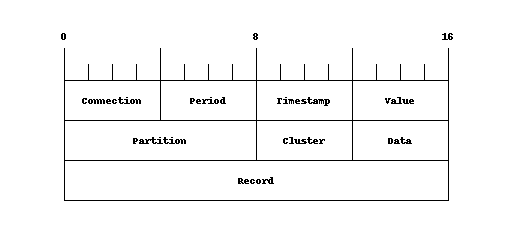
Where connection and period make up the partition (and thus the physical location of the data), the timestamp defines the uniqueness within the block , value is the measured value. We could also create the same object without period, but when the amount of data grows per connection you can’t distribute the data over the nodes and every query will have more data to process.
Note
When creating models (tables), choose your partitioning level wisely, there is quite some documentation available on the internet on how to size your cluster, but generally speaking you should try to limit the number of records in a partition to somewhere below 100.000 and 100 MB in size.
Note
Because the cluster spreads data using a hash of the partition (primary key), you should always use a key to access your data. You shouldn’t try to scan all nodes in a cluster to find a specific record, rather create a model to store the path to your data. (Storage is cheap, so there’s no real reason to avoid de-duplication)
 1from valuea_framework.connectors.nosql import Model
 2from valuea_framework.connectors.nosql import Column
 3from valuea_framework.connectors.nosql.types import String
 4from valuea_framework.connectors.nosql.types import TimeStamp
 5from valuea_framework.connectors.nosql.types import Float
 6from valuea_framework.connectors.nosql.types import Integer
 7
 8
 9class Meterdata(Model):
10    _keyspace = "valuea"
11    connection = Column(String(), primary_key=True)
12    period = Column(Integer(), primary_key=True)
13    timestamp = Column(TimeStamp(), clustering_key=True)
14    value = Column(Float(), default_value=0)
Deployment of the model functions similar to the relational database models, just execute the deploymodel command as shown below to deploy our model:
1cd <your project directory>
2deploymodel --rdbms --nosql .
3
4deploy @ .
5please execute the following as superuser in postgresql:
6CREATE EXTENSION IF NOT EXISTS "uuid-ossp"
Note
On some versions of the Cassandra client library error messages are emitted when a script is being terminated,
if this happens you can safely ignore them. (Example below)
Exception TypeError: "'NoneType' object is not callable" in <bound method Cassandra.__del__ of ...
Generate some test data
Next step is to input some data into our model and look at the results, to do this we will create a simple service accepting a date and a number of connections to create in our new table.
First the service:
 1import random
 2import valuea_framework.broker.Service
 3from valuea_framework.connectors.nosql import Cassandra
 4from valuea_framework.connectors.nosql.partitioner import TimeSeriePartitioner
 5from model.valuea.samplenosql import Meterdata
 6
 7
 8class Service(valuea_framework.broker.BaseService):
 9    def __init__(self, *args, **kwargs):
10        super(Service, self).__init__(*args, **kwargs)
11
12    def execute(self):
13        msg = self.get_message(True)
14        session = Cassandra()
15        partitioner = TimeSeriePartitioner('month')
16        total_value = 0.0
17        for i in range(msg.connections):
18            this_value = random.random()
19            session.add(Meterdata(connection='%018d' % i,
20                                  period=partitioner.get_partition(msg.date),
21                                  timestamp=partitioner.get_value(msg.date),
22                                  value=this_value)
23                        )
24            total_value += this_value
25
26        session.commit()
27
28        return {'status': 'done', 'total': total_value}
 1{
 2	"$schema": "http://json-schema.org/draft-04/schema#",
 3	"description": "generate_nosql_testdata",
 4	"properties": {
 5		"date": {
 6			"type": "string",
 7			"format": "date-time"
 8		},
 9		"connections": {
10			"type": "integer"
11		}
12	},
13	"required": [
14		"date",
15		"connections"
16	]
17}
The basic wireframe is the same as always, define a service (in this case of type BaseService), make sure to ship a schema (the json file) and fetch the message that was send by the client. From line 14 of the python file the actual implementation starts.
Our example expects two parameters, one date and an integer number to define the number of test cases to generate.
From line 14 the magic starts, which we will describe here step by step:
First we need a session, which we can use to query the nosql database (Cassandra). This is done in line 14
A partitioner, which is used to generate periods for our data partitions. This is just a convenient helper to calculate time periods
For our response message we use a variable to store the total value added (a random number), which we will define next
Start a loop ranging from 0 to the number of connections defined in the message
The value for this record we’re going to calculate here, using random
Add new meterdata records, using the value calculated, the date provided and then partition using both the connection and period which we calculate in the same lines
Note the get_value converts the input equally as the partitioner uses.
Add the record value to the total value, which is only used to report it back to the client
Commit our data, which in the nosql case means it will actually flush the data to Cassandra. The normal transaction context like there is in relational systems doesn’t exist here so all done sofar only lives in memory.
Return some data about the status and the total value added
With our service installed, we can now execute it using the code below:
 1#!/usr/bin/env python
 2import services.valuea.samples.generate_nosql_testdata
 3
 4# construct a new object from the generate_nosql_testdata service
 5srv = services.valuea.samples.generate_nosql_testdata.Service()
 6srv.set_message({'connections': 100, 'date': '2017-01-01T00:00:00+01:00'})
 7
 8# execute validations, normally processed within the listener
 9validation_output = srv.validate()
10if validation_output:
11    # Oo, our validation returned issues, print all
12    for message in validation_output:
13        print (message)
14else:
15    # all well, print result
16    result = srv.execute()
17    print (result)
Now after we executed the procedure we can look at some data which has landed in our Cassandra node.
 1  $ export CQLSH_NO_BUNDLED=TRUE ; cqlsh 192.168.56.101
 2  Connected to ValueA at 192.168.56.101:9042.
 3  [cqlsh 5.0.1 | Cassandra 3.6 | CQL spec 3.4.2 | Native protocol v4]
 4  Use HELP for help.
 5  cqlsh> select * from valuea.meterdata limit 5;
 6
 7   connection         | period | timestamp                       | value
 8  --------------------+--------+---------------------------------+----------
 9   000000000000000094 | 201612 | 2016-12-31 23:00:00.000000+0000 | 0.546819
10   000000000000000081 | 201612 | 2016-12-31 23:00:00.000000+0000 | 0.946152
11   000000000000000089 | 201612 | 2016-12-31 23:00:00.000000+0000 |  0.97025
12   000000000000000029 | 201612 | 2016-12-31 23:00:00.000000+0000 | 0.529876
13   000000000000000098 | 201612 | 2016-12-31 23:00:00.000000+0000 | 0.459534
14
15  (5 rows)
The actual commands used are highlighted in the text above.
One thing you notice is that our dates are converted to utc timezone before storing, this default is defined in the TimeSeriePartitioner object, you can easily change this default on construction of the object.
Note
The above query should only be executed on small tables, due to the distributed nature of the database it could try to fetch objects from everywhere. Normally on nosql databases you would only query records with a known partition key.
Reading results
With some data in our (distributed) table, we can try to read something back. So lets create a simple service to fetch all data within a period for a connection.
 1import pytz
 2import valuea_framework.broker.Service
 3from valuea_framework.connectors.nosql import Cassandra
 4from valuea_framework.connectors.nosql.partitioner import TimeSeriePartitioner
 5from model.valuea.samplenosql import Meterdata
 6
 7
 8class Service(valuea_framework.broker.BaseService):
 9    def __init__(self, *args, **kwargs):
10        super(Service, self).__init__(*args, **kwargs)
11
12    def execute(self):
13        result = list()
14        msg = self.get_message(True)
15        session = Cassandra()
16        partitioner = TimeSeriePartitioner('month')
17        for record in session.Query(Meterdata)\
18                .filter_by(connection=msg.connection)\
19                .filter_by(period=partitioner.get_partition(msg.date)):
20            result.append({'connection': record.connection,
21                           'period': record.connection,
22                           'timestamp': pytz.timezone('UTC').localize(record.timestamp)
23                                            .astimezone(pytz.timezone('Europe/Amsterdam')),
24                           'value': record.value})
25
26        return result
 1{
 2	"$schema": "http://json-schema.org/draft-04/schema#",
 3	"description": "read_nosql_testdata",
 4	"properties": {
 5		"date": {
 6			"type": "string",
 7			"format": "date-time"
 8		},
 9		"connection": {
10			"type": "string"
11		}
12	},
13	"required": [
14		"date",
15		"connection"
16	]
17}
We won’t describe the json validator here, because it’s very similar to the others created before. The service itself starts like the previous one with creating a session and a partitioner, next we’re going to execute a query to our object using a connection (number) and a period (determined by the date in the input parameters).
For every record returned, we will add a row to our result list. The complete list of results (in our example only one, provided we have executed the other chapters code without modifications) is then returned back to the client.
Note
The timestamp stored in our record came without timezone information, but because it was stored in utc, we needed to convert it to Amsterdam upon retrieval.
Tip
If you want to retrieve data only stored at the requested date, we would add another filter_by() for the timestamp field using the same timestamp as the one used to store the record. Never discard the period filter, because it’s part of the partition (which tells the cluster where to look for your data)
We expect output in the form of:
1[{'timestamp': datetime.datetime(2017, 1, 1, 0, 0, tzinfo=<DstTzInfo 'Europe/Amsterdam' CET+1:00:00 STD>), 'connection': u'000000000000000081', 'period': u'000000000000000081', 'value': 0.9461519122123718}]
Our mapper is quite similar to the relational one used from sqlalchemy for the basic constructions, because you can’t join data the more complex logic doesn’t exist here.
Next steps
You should be able to store data in your own cluster now and read it back using our models, now is a good time to add some more data and fiddle around with it some more. You can also combine relational data and data stored in the nosql cluster using the RelationalService used in the previous chapter.